Showing posts with label hatches. Show all posts

Saturday, June 28, 2014

Hatch hold-downs

I'm building eight plywood hatches into my boat.  One issue with hatches is how to latch them, with maybe the simplest answer being to put six or so turnbuckles around the perimeter.  I thought it would be more elegant if I could reduce that number to maybe two.  In order to attempt that, I've built in interior hold-downs for one side of the hatch.  This is an idea borrowed from another SCAMP builder.

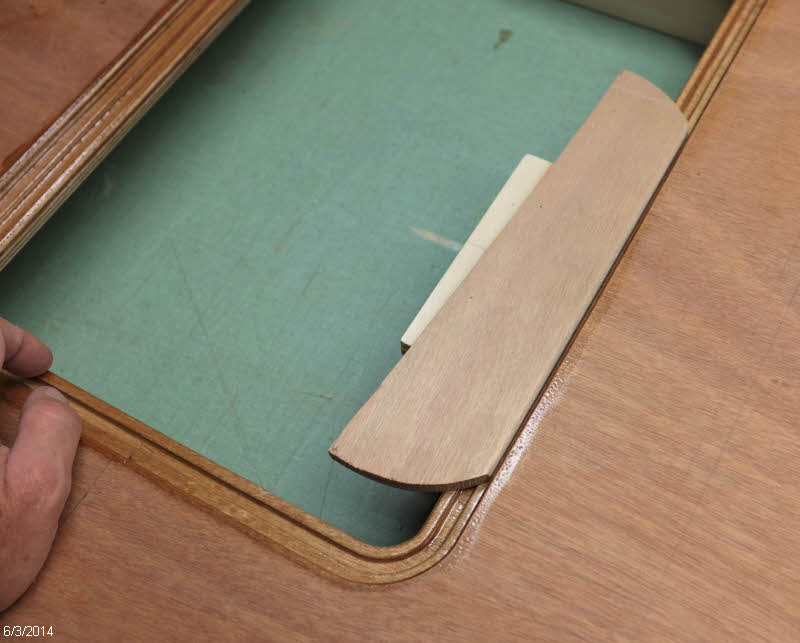
Here's the proto-type.  From the top down, there is hatch cover, hatch stiffener, and then the latch made of three layers of 9mm ply.  Notice that the latch part extends out beyond the edge of the hatch, and this is key.  It gives you room to insert the hatch into the hold, and snugs down the hatch cover on the gasket as the hatch closes.


Here's the prototype being checked for fit


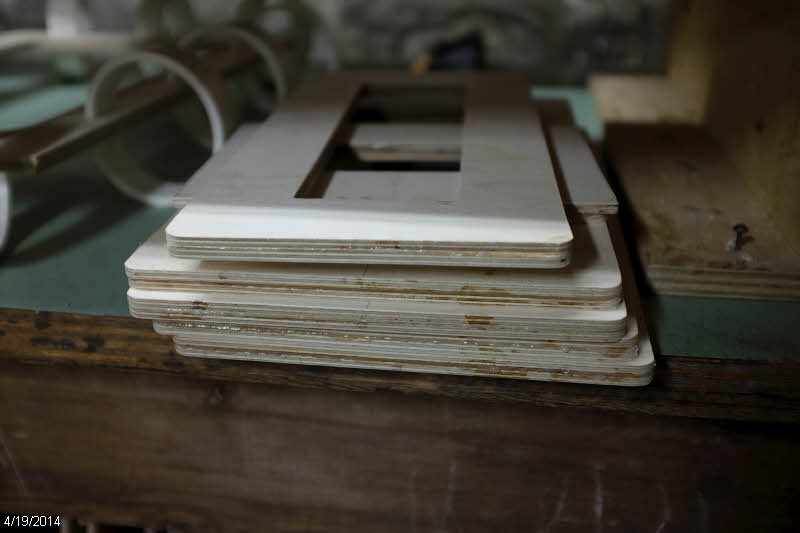
I laminated a bunch of stock and cut it to length.  The two longer pieces are for the seat hatches. The V-cuts are there to locate the hatch in the center of the hole on the latch side and the two adjacent sides.  I cut them to rough dimension with the bandsaw, and then made a little router jig to make sure they are all the same.


I then made a positioning jig to locate the latches side to side and at the proper distance from the edge.


After applying thickened epoxy, I held the latch in place and shot two 23-gauge pins in from the other side to hold it in place ...


... while I removed the positioning jig and applied a couple clamps.  I really like the stainlesss pins in an application like this because they keep the parts from sliding around while putting the clamps on.


Here's the set of them all glued up. 


Next I laminated some stock from which to cut the little triangle pieces.  I inserted each hatch into it's proper hole and shimmed them in  the center.  Then applied thickened epoxy to the triangles and shot them with three pins each to locate and clamp them.  No additional clamping needed for those.  I then removed the hatch covers and cleaned up the epoxy squeeze-out. 


Getting these little triangles installed under the cockpit sole was the piece of work that has been holding me up from getting the cockpit sole glued down. See next post...

Saturday, May 10, 2014

Hatch stiffeners and backing plates installed

I'm finally nearing the end of the hatch construction.  I finished laminating the backing plates,


leaving me with a stack that all needed to be cleaned up of squeeze out, corners rounded and edges routed.


Then I could epoxy them to the hatch covers.  Again I used the trick I've mentioned before, of inducing a little twist in the opposite direction of the twist in present in the hatch lid.  After the epoxy cures and the clamps are removed I end up with near perfect flatness in the lid, which is important for the seal against the gasket.


Then it's time to coat the bare wood with epoxy, sand, and coat again.


Here I'm installing the backing plates for the round hatches in B4 and the aft seat tops.


Thursday, April 24, 2014

Hatches and Secret Passageways

Starting with the stack of hatch opening reinforcements and hatch stiffeners from my last post, I have laminated, cleaned up glue squeeze-out, trimmed, rounded corners and edges, and sanded until I've had about enough of that for a while!  But now they are all ready to go.

Here's a pile of laminated hatch stiffeners on the left and the port seat hatch reinforcement on the right.


Here are the cockpit sole hatch opening reinforcements ready to install.


And here they are clamped up waiting for epoxy to cure.  I made these PVC pipe clamps about 15 years ago when I built my first kayak.  The idea is from Chesapeake Light Craft, and they are made from 4" schedule 40 PVC, cut about 1 1/4" wide, and then cut so they can spread open.  They work well, and are cheap to make.  I find they are best clamping about 1" thickness, they are a bit less effective on this thinner glue-up, so I used a bunch of them.


First coat of sealing epoxy is on those now.  I'll sand the fuzz off and put a couple more coats on before this gets installed.  Same progress with the hatches in both seat tops.


I've also started gluing on the hatch stiffeners to the back side of the hatch lids.  As with the hatches I did for B3, there is some twist in the plywood, so I twist it a bit the other way (see the 4 mm spacer at lower right) and glue it up.  I try to guess right with the spacer so that when unclamped it springs back until it's flat.


As I was doing all this hatch work I was thinking about drainage.  I was thinking that the cracks around the hatches in the cockpit sole are likely to get filled with water in the normal course of events from wet swimsuits climbing in, rain, overflow from filling the ballast tank, etc., and that water would fill the cracks and stay there until it drains into the storage areas if the hatch gets opened.  It seemed to me that could be irritating.

I have seen others rout a channel the full depth of the sole doubler (the top layer) to allow that water to drain away.  But I didn't like the look of that.  After a bit I came up with my idea of "Secret Passageway" drainage!  

I routed a drainage channel on the underside of the sole doubler leading from one corner of the hatch opening to the gutter that runs down to the sump in the rear of the boat.  I cut the channel about half the thickness of the plywood, and angled it back at a 55 degree angle.  The sole has a slight tilt towards the rear so water should drain through here by gravity.


The openings are pretty much invisible, and the cockpit floor is undisturbed.


If these would ever get plugged with gunk it should be pretty easy to poke something through there from the hatch opening side to clean them out.


These channels will be well coated with several coats of epoxy to prevent water from seeping into the plywood, and I'm making a special tool (ok, basically a rounded stick) to run through the channels as I glue the two pieces together, to clean out any thickened epoxy that squeezes into the channel and would block it. 

I think this is going to work nicely.  Any other SCAMP builders that want to borrow the idea please feel free!

===============================
July 27, 2014 addendum - I had a question in the comments about the router and templates I'm using for some of the build sequence, so heres' a shot of the Porter-Cable router.  I've had this for probably 20 years - I don't know if they still make this model (#693 with a #6931 plunge base)


Here's a photo of the bottom with a template guide bushing installed, and some of the other spacers that I've used on this project: 


And here's a shot from above showing the knurled ring that fixes the template guide in place.


Wednesday, April 16, 2014

Cutting cockpit sole and seat top hatch openings

With the hull panels now installed, I put a coat of paint on the inside, and will show a photo of that when I've got the final coat done.  I took a little break from painting and turned my attention to constructing the remaining hatches in the cockpit sole and the seat tops.

I used the same technique I described earlier in > this blog post <.  I used all the same template guide bushings and reused the template itself for three of the cockpit sole hatches and for the hatch on the port seat.  I needed to make additional templates for the ballast tank opening, the starboard seat top hatch, which is narrower due to the centerboard trunk, and the round openings for the plastic hatches in the back corners of the seats.


I took a while to finalize the locations of the cockpit sole hatches, measured (several times!), and started making sawdust. 


Here are the holes completed in the top layer.   These were cut out with a 1/8" bit, and I plan to use the sections cut out as the hatch covers.


In the bottom layer I cut the holes smaller, and included a groove for the gasket.


And then I spent a few hours cutting all the additional backing plates and hatch stiffeners from 1/4" birch ply.  Lots of changing template guides, collets and bits was involved.


Next up, I will sand off the fuzz and round edges and corners, laminate two layers where appropriate, and install them.

Saturday, March 22, 2014

Little jobs

This morning I found that my paint was still tacky, so rather than putting the second coat on I tackled a number of other little jobs.

I applied fillets to the transom, and epoxy coated the bevel I had planed on the bottom of the transom doubler.  I test fit the cockpit sole and found it was a touch long, so I planed off about 1/8" on the back edge.  I believe the bevel on the doubler is doing it's job of making the installation easier.


I then trimmed the centerboard pivot pin to length and made the solid cover that will be glued on the water ballast tank end of the pivot hole.  I also made the cover that holds the head of the bolt and screws on from the underseat area.  Here the rough first coat of epoxy over the bare wood is shown.  I'll smooth that down and recoat before installation.  I also drilled out to 1/4" and epoxy filled the anchor holes for the screws.


Then I clamped the hull to the building jig and removed the screws that were holding it in place.  I put the final coat of epoxy in those areas, and will sand and paint, and then reinstall the hold down screws.  Then I can remove the clamps so they are not in the way of hull panel installation.


A couple days ago I received in the mail an Earlex steam generator, and an eBay purchase of some 6" layflat tubing 4 mils thick,and so I experimented with some steam bending.  

This is a piece of lumberyard pine 10mm x 30mm.  I steamed it for 1/2 hour and was able to easily put a twist in it.  I'm going to try 20mm x 30mm next and if that bends easily I will do that and not have to laminate the under-deck carlins.  I will need to join shorter lengths with epoxy and scarf joints in either case, and I will be running another test with a test joint to ensure the epoxy doesn't soften and let go at that temperature.  I know I can soften epoxy with my heat gun, but that's quite a bit warmer, I think.

By steaming inside the plastic tubing (which is similar in weight to a zip-loc bag), I should be able to do this right on the boat, and not have to hurry from the steam box to the boat before things cool off.  I'll be providing more information on this later.


I also spent some time thinking about where I wanted my seat hatches and how large they should be.  This is the port side with one of the B3 hatches, which is 12 x 18".  I think that looks about right.


But on the starboard side, I have to set it further outboard because the centerboard trunk is under that seat.  this puts it too far out, in my opinion.  I plan to cut a new template so that I can cut the hatch, hatch stiffener, and underseat backing plate about 1 3/4" narrower.


Saturday, March 1, 2014

B3 Hatch covers

To construct the hatches for B3 I epoxied the stiffeners that I had previously laminated out of 2 layers of 1/4" baltic birch plywood.  First I had to clean up the glue squeeze out and round over the corners on the router table.


The 9 mm ply cutouts had a twist in them and would not lie flat, so I took this opportunity to try to correct that.  I put spacers under the low corners and clamped down the high corners.  This flexed the plywood in the opposite direction of the twist.


I then applied thickened epoxy to the stiffener, and clamped it down to cure.  After removing the clamps I found that the hatch now had a slight twist in the other direction - my spacers were a touch too thick.  But it was much closer to flat than previously and the hatch latches should be able to flatten the hatch for a good seal.