Showing posts with label centerboard case. Show all posts

Wednesday, July 9, 2014

Seats installed

Now that the cockpit floor is installed, I next moved on to the seats.  The starboard seat gets a section cut out to provide access to the centerboard from above, which will be handy to have when installing the centerboard.  Since I don't much like square corners, I layed out a curve on the aft end.

I didn't cut this access the full length of the slot, but left it about 8 inches short.  The idea there is to have no seams at the aft end of the trunk.  I have heard that some boats with the cover cut full length could get some water splashing/seeping through the joints, leading to wet clothing, and a recommended solution for that was to have a shorter opening, so I'm trying that.  

For the long straight cut I set up a fence and used the jig saw, after first flattening the set out of the blade with hammer and anvil in order to get a narrower kerf.  


For the corner I used a coping saw, which worked out pretty well.  I should have paid a little more attention to keeping the cut vertical, but it worked out fine.


I rounded over the edges a bit with sandpaper. 


And then put the final coat of epoxy on the underside of the seats and let that cure overnight.


In the morning I spread thickened epoxy on all the cleats and edges of the seat front on set the seats in place. I took care that they fit pretty well, so didn't need any clamps - just a few 23 gauge pins to snug it down and get a little glue squeeze-out. 


I didn't glue the joint between the back of the seats and the hull panels; that joint will be secured when I apply a fillet of epoxy along the joint, which will be the next job.


I'm always glad when the big glue jobs are done!

Sunday, April 6, 2014

Centerboard uphaul tube installed - makeshift flaring tool

Before I finished installing hull panels, I wanted to get the centerboard uphaul tube installed, while it was still easy to work in that area.  This tube lines the hole that the rope runs through to raise the centerboard, and prevents wear to the hole and to the rope.

The uphaul line is 1/4" diameter, so I got a short length of tubing from the hardware store that is 5/16" ID, and 3/8" OD.

First, I drilled the hole.  I wanted to ensure that the hole was perpendicular to the bulkhead, and didn't tear out on the far side.  So I drilled a hole through a scrap block on the drill press to use a a drill guide, and clamped another block on the inside of the centerboard trunk to prevent tear-out.  I drilled a pilot hole and then followed that up with a 7/16" bit.


I cut a short length of tubing, flared the end, and inserted a length of 5/16" dowel and taped it on.  This let me manipulate the tubing, rotating it to apply thickend epoxy and pulling it through the hole. 


I clamped it in place with a stick until the epoxy cured.


Here's the inside, flared edge.


And this is the other side.


And this shows the 1/4" uphaul line exiting the tube.  At this point I considered leaving this as is and calling it done.  The rope pulls straight out of the hole and into a turning block, so I think that would work fine.  At this point the flaring tool doesn't work, and trying to shape it with a ball pein hammer seemed likely to mess things up.


After some thought, I started rummaging around in my 1/4" bolt bin, and found this flat-head machine screw.  My plan was to insert this through the tube with a washer and nut on the inside and flare out the end by tightening the nut in a controlled manner.


Here's the screw Inserted in the tube.


And the resulting flare after tightening up the nut a bit.  Worked great.


But it was sticking out a little too far, so I sanded it back using a little disk in a die grinder, and flared again.


And then I did follow up with a little light tapping from the ball pein hammer to fllatten it out just a bit more.  Job done!

Tuesday, February 11, 2014

Pivot bushings installed

After the oversized, epoxy-filled pivot holes in the rudder and centerboard cured, I drilled them out with a forstner bit to the right size for the bronze bushings, and proceeded to prepare the bushings.  My local hardware store didn't sell bushings long enough for the full width of the parts, so I bought them in pairs.  I used one full length (1 1/8 inches) and shortened the second one to make up the length required.

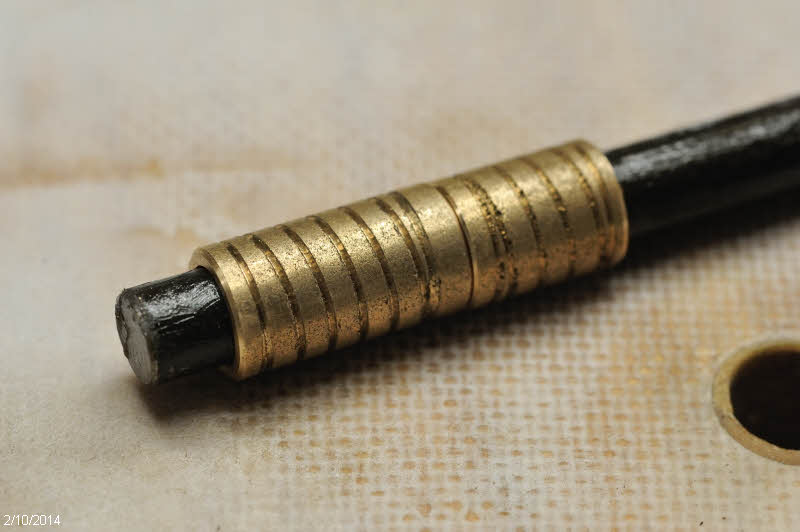
I first cut the bushing to rough length with a hacksaw, then chucked it up in the metal lathe and faced of the end.  I was having fun, so decided to spend the time turning a shoulder on one part and boring a recess in the other for a nicer job.  I then turned some coarse threads on the outside to give the epoxy something to grip.


Can hardly see the joint when these go together.  Nice to have a lathe... 


Here's a shot showing the threading in progress on one of the bushings that goes in the centerboard case.


However, to save time on the rudder pivot I just used a butt joint.  


I put a piece of tape across the bottom of the holes, coated the outsides with unthickened epoxy, and inserted them in the holes.

When I installed the centerboard case bushings, I combined two steps.  Instead of drilling the holes oversized, filling them with epoxy, and then drilling them out again, I instead drilled oversize and then cast the bushings in place.

To hold them in perfect alignment, I used a spacer block that fit exactly inside the case.  I taped both sides, and drilled a 1/2" hole on the drill press.  Here's the spacer block installed in the centerboard case.


I then could put a greased 1/2" rod through the bushing and block to ensure the bushing was perpendicular.


I coated the inside of the hole with unthickened epoxy, then coated both the inside of the hole and the outside of the bushing with thickened epoxy and inserted the bushing.  Then poked around with a toothpick to try to make sure there were no air bubbles in there.  If I were doing this again, I would drill the oversized hole larger to make it easier to get the epoxy in there.  The bushing is 3/4" outside diameter, and the hole is 7/8", so just 1/16" gap.


I filled the top hole, then the next morning turned the part over and did the other side.  After the epoxy cured I removed the rod and was able to drop the pivot bolt in with no binding, so I was pleased with my success in getting these bushings aligned with each other, and perpendicular to the surface.

I liked doing this work on the flat vs. trying to install these after the centerboard case was in the boat.  Other than dealing with large parts it was fairly easy to keep holes perpendicular on the drill press, checking alignment with a small square.

Saturday, February 8, 2014

Centerboard case assembled, spacers created


I have decided to build the centerboard case outside of the boat for several reasons.  Primarily I wanted to be able to put the case on the drill press to ensure the centerboard pivot holes are perpendicular and perfectly in line.  In addition, this also lets me glue on the flat, and I can use clamps vs. drilling screw holes and having to fill those in afterward.  

I took quite a bit of time to ensure all parts were aligned, then made marks so I could replace things in the right place.  I applied unthickened epoxy to the bare wood of the case ends to make sure they were saturated, and then followed that up with thickened epoxy on both the end pieces and the case sides.

Once the glue was applied, everything was very slick, but I aligned marks and then fired in a couple pins from my pin nailer, which kept the pieces from sliding around when I applied the clamps.  That worked well.

Both these plywood pieces had a bit of a twist in them, so you can see I have the far right corner clamped down to the heavy table, and the leftmost corner pushed down with a go-bar against the ceiling to take out the twist.


Gentle clamping pressure was applied to avoid starving the joints, and the inner case corners were smoothed over with a long dowel.  In this photo you can see the end of a couple long spacer sticks lying the long way in the case to keep the sides the right distance part and make sure there is no overall bowing of the part.


I also set up the rudder and centerboard on the drill press and drilled the pivot holes out oversized.


And filled them with thickened epoxy.  After that's dry, I'll drill the holes out to accept bronze bushings.


To keep the installed centerboard in the middle of the case, I visited the local hardware store looking for some large nylon washers, but didn't find anything appropriate.  So I looked around the shop and found this chunk of plastic I picked up at a salvage yard some years ago.  I've already used a corner of this for something, can't remember what.  I traced a circle and cut it out with the bandsaw, then did my best to resaw it the thin way to yield two blanks.


As you can see below, that didn't go too well, as I had trouble with the blade wandering.  But I have plenty of thickness to work with and one flat face to start with.  I attached piece of plywood to the faceplate of the lathe, and used double stick tape to attach the plastic to that.


I faced off the plastic until it was smooth and about the right thickness (just over 1/8th inch), and trimmed the outside edge to make it round.


Then drilled the center hole.


Here's the plastic stock, rough blank, and finished part.


And here's a picture showing the overall size of the spacers on the centerboard.  They are about 3 inches across, which seems a good size to me.


Wednesday, February 5, 2014

First dry fitting, and centerboard case work


With the jig done, it was time to fasten on the bottom of the hull. Lined up perfectly centered, the hull panel is held on with four screws through plywood pads and into two cross members on the jig.


I then squared up all the routed aligning indentations with a small chisel, and squared up the corresponding tabs on the bulkheads with a file, and then did a dry-fit of the parts.  That was pretty neat - I can really get a sense of the size and shape of the hull now!


Before gluing any of that in, I need to finalize the centerboard case.  I decided to epoxy the doublers on to the panels before installation.


The next pieces I need will be the solid stock for the ends of the case, and that's still getting epoxy coats, so is delaying the process.  But that gives me time to think about where I want hatches.  

And opportunity to keep applying fairing mix and smoothing that off the rudder and centerboard. With each iteration they get closer to done...


Monday, December 16, 2013

Sanding, epoxy, and fiberglass work


Since last update I've spent quite a bit of time with the sander, sanding all the parts that had their second coat of epoxy (bulkheads), and some bid ones with their first coat (seat longitudinals and centerboard case side).  

I still need to scuff up the edges by hand, but after that the parts with two coats applied are ready for installation in the hull.  After they are in place paint is the final coating.

Digging through the scraps of 6 oz. fiberglass I had from a previous kayak project, I found a piece just large enough for the inside pieces of the centerboard case, so decided to install that next.  I'll have to place an order for some more so it's on hand when I need it for the bottom of the hull.


It's always fun to see the fiberglass go clear and show the wood grain underneath as the epoxy saturates the cloth.


I also put the second coat of epoxy on the inside of the bow transom and the inside of the mast trunk pieces.  I used a section of foam roller to tip out the air bubbles left by the roller, and it leaves a pretty nice finish.


And today I sanded the second coat of epoxy on the inside of the mast trunk pieces. Assembling this will be one of the next jobs coming up, and it will be fun to be at the point of starting to put some parts together!