Showing posts with label rudder. Show all posts

Tuesday, February 11, 2014

Pivot bushings installed

After the oversized, epoxy-filled pivot holes in the rudder and centerboard cured, I drilled them out with a forstner bit to the right size for the bronze bushings, and proceeded to prepare the bushings.  My local hardware store didn't sell bushings long enough for the full width of the parts, so I bought them in pairs.  I used one full length (1 1/8 inches) and shortened the second one to make up the length required.

I first cut the bushing to rough length with a hacksaw, then chucked it up in the metal lathe and faced of the end.  I was having fun, so decided to spend the time turning a shoulder on one part and boring a recess in the other for a nicer job.  I then turned some coarse threads on the outside to give the epoxy something to grip.


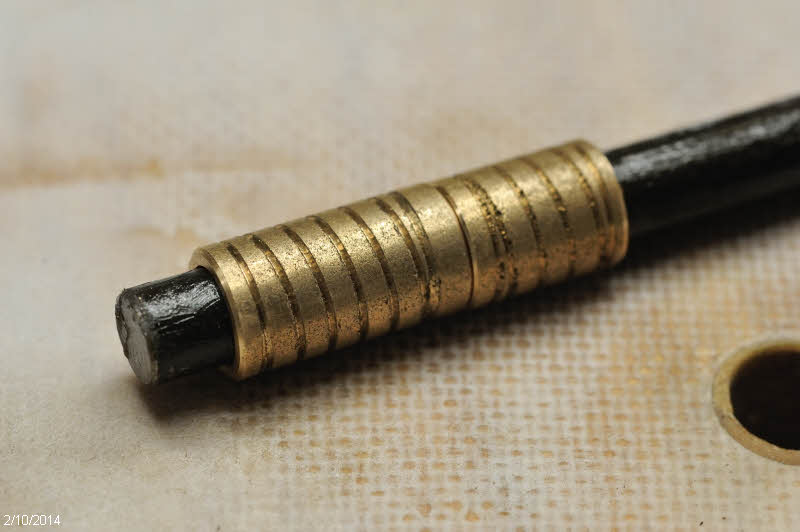
Can hardly see the joint when these go together.  Nice to have a lathe... 


Here's a shot showing the threading in progress on one of the bushings that goes in the centerboard case.


However, to save time on the rudder pivot I just used a butt joint.  


I put a piece of tape across the bottom of the holes, coated the outsides with unthickened epoxy, and inserted them in the holes.

When I installed the centerboard case bushings, I combined two steps.  Instead of drilling the holes oversized, filling them with epoxy, and then drilling them out again, I instead drilled oversize and then cast the bushings in place.

To hold them in perfect alignment, I used a spacer block that fit exactly inside the case.  I taped both sides, and drilled a 1/2" hole on the drill press.  Here's the spacer block installed in the centerboard case.


I then could put a greased 1/2" rod through the bushing and block to ensure the bushing was perpendicular.


I coated the inside of the hole with unthickened epoxy, then coated both the inside of the hole and the outside of the bushing with thickened epoxy and inserted the bushing.  Then poked around with a toothpick to try to make sure there were no air bubbles in there.  If I were doing this again, I would drill the oversized hole larger to make it easier to get the epoxy in there.  The bushing is 3/4" outside diameter, and the hole is 7/8", so just 1/16" gap.


I filled the top hole, then the next morning turned the part over and did the other side.  After the epoxy cured I removed the rod and was able to drop the pivot bolt in with no binding, so I was pleased with my success in getting these bushings aligned with each other, and perpendicular to the surface.

I liked doing this work on the flat vs. trying to install these after the centerboard case was in the boat.  Other than dealing with large parts it was fairly easy to keep holes perpendicular on the drill press, checking alignment with a small square.

Wednesday, February 5, 2014

First dry fitting, and centerboard case work


With the jig done, it was time to fasten on the bottom of the hull. Lined up perfectly centered, the hull panel is held on with four screws through plywood pads and into two cross members on the jig.


I then squared up all the routed aligning indentations with a small chisel, and squared up the corresponding tabs on the bulkheads with a file, and then did a dry-fit of the parts.  That was pretty neat - I can really get a sense of the size and shape of the hull now!


Before gluing any of that in, I need to finalize the centerboard case.  I decided to epoxy the doublers on to the panels before installation.


The next pieces I need will be the solid stock for the ends of the case, and that's still getting epoxy coats, so is delaying the process.  But that gives me time to think about where I want hatches.  

And opportunity to keep applying fairing mix and smoothing that off the rudder and centerboard. With each iteration they get closer to done...


Thursday, January 23, 2014

Rudder/centerboard work and more puzzle joints

Since last update I have been epoxy coating and sanding more parts, and am running out of those.  I've been finishing up the rudder and centerboard by adding  fiberglass cloth to the trailing edges and the top edges.


Then I got a little carried away and started applying epoxy mixed for fairing, but just realized while writing this I haven't put on the dynel cloth on the front edges, so will need to backtrack a bit on that.


I also glued up the puzzle joints in the deck side pieces tonight.  One more puzzle joint glue up to go, where these side pieces are joined to the front piece.  I plan to do that before assembling the jig for the boat, which will take up a lot of my workspace.


Wednesday, January 15, 2014

Cleanup

Spent a little time today trimming off the excess fiberglass and feathering in the overlap, photos below.  I need to check with the SCAMP community regarding a couple things.

First, I wonder if there is any reason to keep areas like this square?


I'm thinking of putting about 1/4" round over on there and then fiberglassing the edge.

Secondly, I thought I was done applying glass on these parts (other than doubling up the edges), but then I saw a couple references today to other builders putting on two layers of fiberglass.  I reviewed the build manual and didn't see reference to that there, so not sure where that came from.


Tuesday, January 14, 2014

Rudder and centerboard fiberglassing

The rudder and centerboard glue-up turned out great.  I spent some time cleaning up glue squeeze-out and making sure all the surfaces were rounded off to the extent I thought right, and then decided to go ahead and put the fiberglass on.

Since the entire sides of the parts get fiberglass, and the cloth is to wrap around the leading edges, I wondered how to hold the parts while I applied the cloth and epoxy.  I decided to put a couple dowels in a stick of wood that would match up with the holes in the parts.  Then I could put the stick in the vise and have unobstructed access to one side at a time.

Here's the rudder ready to go.  Since this part was light I was not too worried about the strength of my fixture.


The centerboard was a different story.  There's about 22 lbs of lead in the board, and it's all hanging out at the far end.  Kinda scary - I wondered if I'd be able to cantilever that out.  I used a 5/8 wooden dowel in the big hole, and a steel pin in the small hole.  And I had to triangulate the stick with a brace against the bench so the whole works would not twist in the vise.  Seemed to hold OK for this job.


Holding the parts like this worked out well.  I had access to the entire side, and could work the far side where the fiberglass wrapped around.  

Here's the rudder with the fiberglass wet out.  The white patch is some fairing compound (epoxy and glass microballoons) showing through the cloth.


Today, after the first sides were cured, I trimmed the excess fiberglass off, and feathered in the edge of the cloth that would be covered when applying glass to the second side.  Here I'm using a utility knife blade as a scraper, and that worked very well.  This is a tip from Howard Rice on the SCAMP forum.  


After getting the parts cleaned up, I reversed the holding jigs and applied cloth to the other sides.

Sunday, January 12, 2014

Rudder and centerboard lamination

I decided it was time to get the rudder and centerboard pieces assembled, so I spread glue on the mating faces, using a notched spreader to distribute the epoxy across the surface.


 Then applied clamps until I had squeeze out all along the seam.


Here's a shot of the centerboard clamping.  It takes a lot of clamps!  At the far end of the table you can catch a glimpse of my 23 gauge pin nailer.  After I slid the halves around until they were in alignment I shot a few 1" stainless pins in to keep the parts from sliding around while clamping pressure was applied.  That worked well.


I've also glued up the puzzle joint in the cockpit sole, and have been busy epoxy coating all the major parts of the boat that would need it sooner or later.  Sole, sole doubler, deck parts, transom cap.  I'm running out of parts, so that's good.  It will be nice to have them all ready to go at assembly time.


Monday, December 30, 2013

Rudder weights glued in

Tonight the various pieces I had epoxied last evening were not cured enough to sand.  I did a little hand sanding on one side of the centerboard, but needs to cure further.  Since the fairing work on the rudder halves is about done I decided it was time to epoxy in the weights, so I did that with some thickened epoxy. 


And then I did another coat of epoxy/graphite  on the two pieces that make up the centerboard case.  I coated over what I had done last night without sanding.  I think since the previous coat is not fully cured that I'll get good adhesion.


This is as much as I will have time for before Jan 1.  Happy New Year!

Sunday, December 29, 2013

Fairing rudder and centerboard

A while back I had mixed up a batch of epoxy thickened with microballoons (tiny glass spheres) and filled low spots in the centerboard and rudder.  This lightweight fairing mixture sands very easily, and can be worked by hand or with the random orbit sander.

I used some partially worn out sandpaper and a flat block to smooth some areas, and backed up the sandpaper with the large wood cylinder for some of the curves where the blades transition to the flat areas.


I found I had a few spots that needed more filling, so marked those with pencil and applied more fill there.


I found that it's easier to tell where the curve is not fair by running my hand along the surface than it is to try to spot those areas by eye.


Thursday, November 28, 2013

Lead Pour - centerboard and rudder

Thanksgiving Day in the shop - I worked today on adding lead ballast to the centerboard (22 lbs) and the rudder (2 1/2 lbs).  The latest plans addendum was published just in time.


Starting with the centerboard, I used a large calipers to verify the thickness, marking the 13mm contour so the router would not break through at a depth of 10mm.  


I calculated how much space was needed and built a template for the router out of one of the offcuts from the kit.  I fastened the the template on with 1/2" pins driven with my Cadex 23 gauge pin nailer, which worked great.  When done, the template pulled off, leaving the pins, which I pulled with a pliers.  I cut to a depth of 10mm and left an island in the middle so the router wouldn't dive in, and later put a big base on the router and removed the island.


I did the same for the rudder, but cut these only 7.5 mm deep.


I got out my little aluminum foundry and fired it up to melt the lead.


Fun to pour metal...


There must be a bit of moisture in the plywood, as the lead bubbled and boiled.  This was a much bigger issue on the centerboard pours which have a lot more metal in them.  


Due to the bubbling, there are some voids in the underside that I may fill in after I get things smoothed out and check the final weight.


So, I'm happy with this progress today!