Showing posts with label epoxy. Show all posts

Sunday, March 1, 2015

Mast and spars - final sanding and shaping

With the mast fairly round after my work with the hand plane, I continued with the final sanding.  I used a power sander to knock down the worst of the ridges, but my hand could still feel edges, so I then worked it over a couple times with a long strip of sandpaper, which could wrap around and did a good job of taking off the high spots.  It's pretty round now, and I've judged it good enough. Here's a shot of the base:


This is what a scarf joint looks like in one of the staves.


I then took my shinto rasp to the top end for a rough shaping.


And then finished up with 80-grit sandpaper over a foam sanding block.  80-grit is the finest I've used anywhere on the boat.


I then spent some time figuring out where the sail would lay on the spars, so I could determine where to drill the holes to hold the ends of the sail to the boom and the yard.  This took a while on the boom, as I also was figuring out where the eye straps and cheek blocks would go that handle the reefing lines.  I built my boom 6" longer than the plans, and ended up cutting two inches off.


I then rounded off the ends of the boom and yard, and drilled holes to lash the ends of the sail in place.  I coated the inside of the holes with epoxy.


I also rounded off the edges on the base of the mast,


And applied a layer of fiberglass to the plug for wear resistance, as this will be inserted into the mast step with each voyage.


At the same time I filled in some small voids in a couple places on the mast.  These were caused when I had a bit of a glitch routing out the V-grooves. The stave rode up and the router bit cut a little closer to the edge in a couple spots.  I didn't have quite enough epoxy spread in the joint to fill this on initial glue up.


So I brushed in a little unthickened epoxy, which flowed in to fill them completely.


When the epoxy cures I will sand things smooth, run a fillet around the plug in the bottom of the mast, and then coat the mast and spars with epoxy.  As of now I plan to paint the boom and the yard and varnish the mast to show off the wood.

Here's a sneak peak of the start to an upcoming project - I found this one really nice 16' long cedar 2x6 in the rack at Menards.  Nice tight grain and very few knots.  I'm planning to use this to build my yuloh - a Chinese sculling oar that I will use to move the boat when the wind dies.  I'll have more information on that to come.


Sunday, February 22, 2015

Birdsmouth mast glued up

I have had the parts for the mast cut out and ready to go for about six months (see <this post>), and this weekend seemed like the right time to assemble them.

I decided to construct a jig to facilitate holding the staves in position while getting them clamped up.  I gathered a couple sawhorses and several other stands and spaced them out along the length of the mast.  I then measured the mast rough diameter at each station and cut out matching profiles from some 1/4" plywood.

I then attached some short pieces of 3/4 plywood recycled from the building jig to each support so that I would have something to attach the profiles to.  Setting up a laser level made it fairly easy to align the supports.  On each one I had drawn a horizontal line and a vertical line, and layed out and cut my semicircles from the intersection of the two.  Having the lines left over on the supports was key to easy alignment.

Here's a shot showing the vertical alignment.


And here you can see the horizontal alignment.  I held the profiles in place with clamps until satisfied with the alignment, then drove a couple screws through to fix them in position.


This setup ensured the jig was straight in both directions, and aligning the center points automatically took into account the taper in the mast, which is not constant along the length.  Here's an overall view with the mast dry-fit in place.


With the jig set up, I next ensured I had the plugs for the ends of the mast ready to go.  The top end is plugged by a simple octagonal stick about 3/4" thick.  The plug at the base of the mast is also octagonal, but protrudes from the end with a square section that will fit into the mast step.  

I cut away the top of the plug so there would not be an abrupt transition from solid to hollow. An abrupt transition can cause failure at that point if the mast is under bending stress.  That won't be the case here, as this is a short plug about 1 foot long, and the mast is supported well above that height at the cabin roof, but I had seen it done elsewhere and thought I may as well do it.


With all the pieces ready, I lined up all the mast staves and clamped them together.  I thought it would be easier to apply the epoxy this way rather than handling each stave individually, and it worked out well.


I first wet them out with unthickened epoxy using a short 1" section of roller.  I did the V side and the back side, then the V side again.  The idea is to let the wood absorb what it can, so that it doesn't suck the epoxy out of the joint during glue-up, leaving a weak spot.


Once the staves and plugs were wet out, I mixed and spread thickened epoxy on the V side. I made a little custom spreading stick by sanding it to a point and filing notcches in the edge.


The notches leave some epoxy behind, so that there is an appropriate amount distributed along the joint.


Holding the stick at an angle allows it to fit the sides of the V.


No photos of the epoxy spreading, as things were just slightly frantic at this stage - I wanted to be sure the epoxy didn't start to cure before I could get it all clamped up.  I was glad to have my wife's help mixing up epoxy.

Once all the staves were spread with epoxy it was back into the jig with them, which made the alignment and fitting together of the joints a snap.

I used hose clamps to pull the staves together, and then applied zip ties to hold them in place, then moved the clamp down and repeated.  I had a number of hose clamps, so a left them in place periodically, rather than unscrewing them all the way to move them past the next support cradle.


The next day I removed the clamps and saw that things were looking pretty good.


I got out my block plane and planed down the projecting corners to make the mast 8-sided.


And then planed the corners to make it 16-sided


And then then 32-sided.  The mast is now a bit smaller than the support jig cutouts and tends to slide.  I moved the end support and raised it up to provide an end-stop.


And then planed the ridges again to be about 64-sided.  It's a bit hard to be sure where you have planed and where you have not at this point.


Lots of neat curls resulted.  Too bad I can't think of a use for these.


Next I'll switch to sandpaper to remove the remaining ridges, then round off the top and apply some finish.  Not sure yet whether I want to put a couple coats epoxy and then varnish, or maybe go with white paint instead.

Saturday, February 7, 2015

Seat back tops laminated and installed

Before doing any more painting I next wanted to create and install the tops on the seat backs. This is the last structural part of the boat to be built, so getting this done is a great milestone.

I've been thinking over time how I wanted to handle this part.  Some builders don't have any trim installed in this area, and some builders have fairly wide tops installed, the better to sit on. Because I don't yet know whether I'll want to perch up there much, and don't know where the favored location will be if I do, I decided to just install a medium wide top, as I can always modify that later if I want to.

I decided on a top that is about 3/4" thick and 2" wide.  I laminated this up from four 1/2" strips of pine, which take the bend fairly easily.


I put clear packing tape on the tops of the seats, so that I could laminate the tops in place. It was another glue-up that took most of my clamps.  I used C-clamps to clamp sticks to the seatback on the inner part of the curve, then pulled in the ends with the handscrew clamps.  I used lightweight bar clamps down to the bottom of the seat back to pull the top down to the curve, some small bar clamps with sticks to align the top of the lamination, and some small bar clamps and c-clamps to hold the laminations together.  Quite a conglomeration.


After the epoxy cured I had two tops that were curved just right to fit the seat backs.


I knocked off most of the squeeze out with a scraper, and then a quick trip through the planer had them looking nice.


The next step was to determine the edge profile.  I cut off a bit of the extra length and layed out three different radii on the edges.  My largest roundover bit is 1/2" radius, so I used that on the inner top.  I didn't want the outer edge to be completely rounded over, so used a smaller bit on the bottom edge of that.


The only tricky part to fit was the return at the front of the cockpit.  This has a compound bevel where it meets the cabin side, and it's easy to get too short as you sneak up on the right fit. 


But I got this side just about perfect.  As for the one on the other side, well, that's what thickened epoxy is for...


I primed the bare wood with unthickened epoxy, and then used silica-thickened epoxy to glue down the parts. After the epoxy cured and the clamps were cleared away I was pleased with the way things were looking.


And a little sanding dresses it up even further.


When I clamped these for gluing, I tried to let them hang over to the inside just a bit, so that I could bring them back flush with spokeshave, sandpaper and scraper.  This shot is from before I did that.


After bringing the insides flush and cleaning up a bit of squeeze out on the underside I sanded them all over and then finished up with a fillet of epoxy.  Here at the cabin junction:


And all along underneath the edge.


I climbed in the boat and tried them out and found this bit of wood provides a really nice arm rest with no sharp edges, and sitting up on top for a bit to stretch my legs if wanted should be very doable, too.  All in all a nice looking and functional addition to the seat backs that finishes things off nicely.

Sunday, December 14, 2014

Protecting the pointy end

With the skegs installed, I was looking forward to starting the hull paint job.  But as I viewed the bare hull my eye kept returning to the pointy end.  I thought about that one layer of fiberglass cloth and thought about the potential abrasion from all the beaches I expect to pull up on.  I knew I would feel better about the situation if I had a little more protection in place.

So I decided to delay the hull painting and put a couple layers of dynel cloth on the pointy part. Dynel is an abrasion-resistant cloth, and I have applied it to the front edges of the rudder and centerboard also.

Here is the first layer of cloth cut and marked with dots from a black Sharpie pen so I don't slide it too far out of place when applying the epoxy.


Here's the bottom layer wetted out with epoxy.  It takes more than the fiberglass cloth does, and seems to swell up a little as it absorbs the epoxy.


Here's the second layer in place.


I knew I would have to apply fill coats anyway, so I tried something new this time, and applied the first fill coat right over the wet cloth.  Seemed to work OK, and maybe saved me one iteration.


Here's one of the followup fill coats.  You can see the microballoon-thickened epoxy has sagged before it dried.  It's hard to get it thick enough so that doesn't happen.  If you mix it too thick it doesn't spread out smoothly.


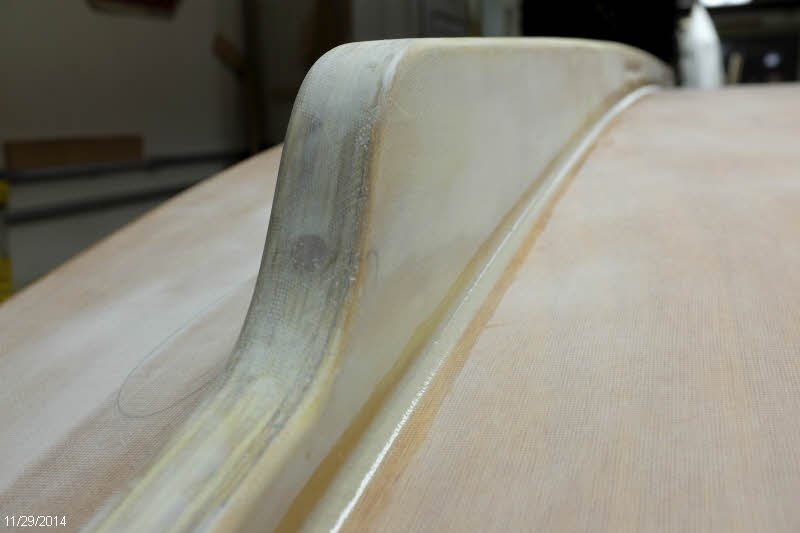
Here's what it looks like when almost done.  You can see that I have sanded and filled multiple times, marking the low spots each time with pencilled circles.  

I don't think I'll be able to get this perfect, but I don't want it to look too lumpy.  I put one more coat on this evening and hope that will be the last one.


Sunday, November 30, 2014

Skegs finally finished and installed

With one thing and another, I've been working on finishing these skegs for far longer than I thought it would take.  In the previous post I covered how I shaped the skegs from two layers of 3/4" plywood.  The next step was to sheath them with fiberglass cloth.  

To make best use of the cloth I cut strips off the width of the 50" cloth.  It took two pieces per side, for a total of 8 pieces, which overlap on what will be the bottom edge.  

Because of the finger hold cutouts I didn't feel I could apply one piece from one side around the edge and down the other.  So applying one piece at a time on each side, I had at least four separate sessions to apply all the cloth.

Getting the cloth to conform to the fingerholds took a lot of prodding with the epoxy brush to keep the glass from pulling up and allowing air bubbles underneath.  That went on for an hour or so after laying the cloth until the epoxy started to cure.  


Before applying the glass I had rounded over the edges of the finger holds with sandpaper, except for one that I either forgot to do, or didn't round enough.  I could not get the cloth to stay down, so I put on a layer of release fabric and clamped a dowel of the right size in place.


That worked pretty well, though the dowel was a bit of trouble to break loose.  I could have just put packing tape over the dowel and skipped the release fabric, but I wanted to try out the fabric.

After I got all the fiberglass applied, I had multiple sessions of applying fairing compound, sanding it smooth, and iterating on the low spots.  While I had the fairing mix made, I took the opportunity to do a little more work on the rudder and centerboard, which I had set aside short of completion some time ago.


I'm going to put UHMW plastic on the edges of the skegs, so I ripped about 1/4" off my 1 1/2" wide stock, rounded the ends, and routed the edges.  I'm going to countersink stainless screws into this to hold it on.


To keep water from following the screws and getting under the fiberglass, I drilled oversize holes to fill with epoxy.  I'll then drill pilot holds into the epoxy plugs to drive the screws in there.


Here's a shot of my old Delta drill press, which has a swivel head.  I think this is the only time I've ever swiveled it...


Here I've filled the holes with epoxy thickened with wood flour.


And here's the result after removing the excess. 


To locate the skegs on the boat and ensure they are parallel and equally spaced from center, I taped down a reference line and measured out from that. 


I applied thickened epoxy, and braced the skegs from the ceiling.  Not much pressure was needed.  

I didn't find a specific measurement for how wide to space the skegs, so I guessed at a spacing that looked right to me.  I wanted to leave enough space next to the centerboard slot to allow for the fillet, the tape to adhere the centerboard slot gasket, and room for the gasket to flex.


After the epoxy cured, I ran a fillet around the edges.


Heres' an overall view.  Looking good!


I finished off the fillets by sanding them a bit with a small dowel wrapped in sandpaper.  It didn't take long and they smoothed out very nicely.  These are now some of the nicest fillets no one will ever see...


Now I will give the final sanding to the hull panels, and it will be time to slap on some paint!