Saturday, August 16, 2014

Mast, boom, and yard - making some expensive shavings

A couple posts ago I talked about installing the gunwales and carlins on the hull, and discussed the problems I was having with the epoxied scarf joints giving way under the heat of the steam. To avoid the problem when installing the carlins, I wanted to get those parts in one piece.

My thoughts turned to the four beautiful Sitka Spruce boards I have had taking up space in the garage since April or so.  These were destined to be turned into mast, boom, and yard.  But I took another look at them and realized that with judicious layout and cutting I would have enough stock to get the carlins out, too.

Since the carlins were next to be installed, I decided it was time to cut up the spruce.  These boards are so long that I had to move my tools out to the garage so that I could send the outfeed end into the great outdoors.


My first step was to snap a chalk line, set up a fence and trim with a portable circular saw to get a straight edge to bear against the fence. 


Then I made some sawdust.  Here are the eight mast staves, two pieces of the yard, two pieces for the boom, and the stock for the two carlins.  I cut off the extra length from the long carlin to scarf onto the ends of two mast staves that came out of a board that was just a bit too short. 


I sent everything through the surface planer to reduce them to dimension,  and then scarfed the two short mast staves.


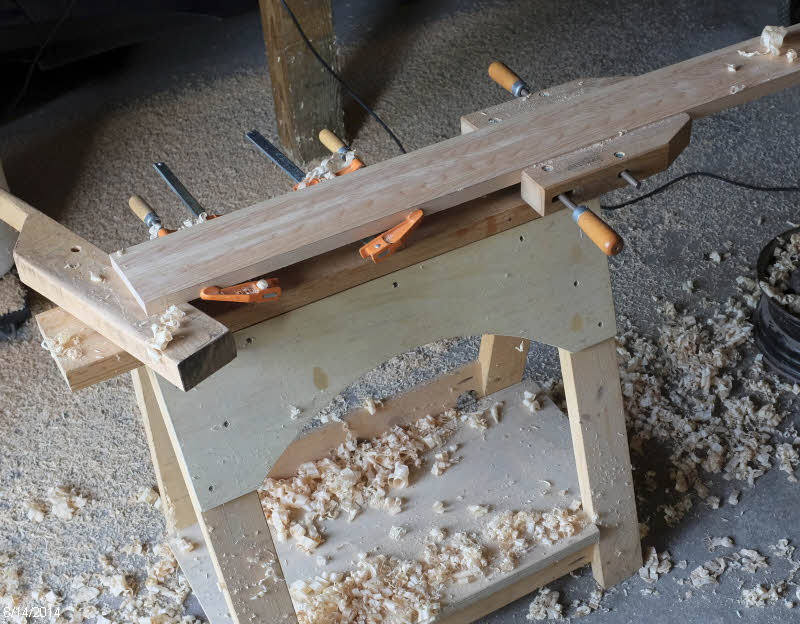
I then laminated the boom and yard.


Next up was to taper the mast staves.  I decided to do this by clamping them all together and planing them down.  I layed out guide lines on the two outer staves so I could tell when I was done.


I took off the bulk of the wood with a power planer, and then finished up with hand tools, which are more precise and controllable. 


After planing the taper, I applied two coats of epoxy to what will be the inner surfaces of the hollow mast.


I set up my birdsmouth cutter in the router table to cut the edges.  I test fit the parts, and it looks like it will make a mast.  Here's the diameter of the base. 


And here's the size of the top end.


The boom and yard have tapers on each end.  I was able to saw away some of the wood on the boom, but the remainder of the machining on that and all of the shaping on the yard was with hand planes, which made an impressive pile of shavings.


Next up with these parts will be to make the plugs for the ends of the mast and glue that up, round off the corners of the boom, and plane the mast and yard to final round dimensions.

Custom chart racks designed, built, and installed

SCAMP has a ton of storage in front of bulkhead 3, though I expect it will be best for lightweight items like sleeping bags, pillows, clothing.  And if out on a multi-day trip, it would be good to have some reading material along.  Rather than let maps, books, and magazines fall to the floor I thought it would be good to have some dedicated storage for those items.  Inspired by builder Dan from British Columbia, I decided to build some racks.

I started out with a cardboard prototype that I modified a number of times.  It was very difficult to get all the angles to look right and fit the hull.  I eventually decided on something like this.


I then built the prototype again, this time in some light plywood from some old panelling.  The cardboard flexes and lets you cheat a little with the fit, so using more rigid material let me finalize the angles and fit of the pieces.  Masking tape works fine to hold the pieces together.


Once I had all the pieces fitting right, I disassembled the shelf and transferred the dimensions to extra ply from the boat.  The bottom of the shelf is 9mm, and the sides and front are of 6mm.  

One of the benefits of making a good pattern was that I could reverse all the pieces and make a mirror image, so I did that and made a chart rack for both port and starboard. 

I taped the parts together again.


And ran a fillet of epoxy on the inside.  I didn't make any effort to glue the pieces together except for the fillet, and that works fine.


Next I taped on the front pieces.


And filleted them in place.  After the epoxy cured I used the 12" disk sander to sand all the overhangs flush.


Here's a shot of the progression from cardboard prototype to finished item.


The angles look a little funny here, but they all make sense in the boat.  Nothing is square on these, and all the compound angles made this a challenging little project.  I spent more time designing and building this than I care to admit, but I'm happy with the result.


I decided to let the wood shine through on these parts, and applied 2 coats of epoxy to finish them off.  No need for varnish or anything to protect from UV as they will be in an enclosed area of the boat.


I lined up the shelves and marked their position, then fired two pin nails from the inside of the boat through the hull to mark where the bottom of the shelf was.  I then buttered up the edges of the shelf with thickened epoxy and held it in place while my wife helped out by firing two pins from the hull exterior into the bottom of the shelf to hold it in place.  One strip of tape held the top of the shelf against the hull. 


I then filleted around the shelf/hull joints to finish things off.  I'll touch up the paint that I had to scrape off to mount these and the installation will be complete. 


Port gunwale and deck carlins in place

After the troubles I'd been having with scarf joints giving way under the head of steam bending, I was careful on the port gunwale to avoid steaming the two scarf joints present there.  I steamed the gunwale in sections, and that's easy to do using the plastic bag method of containing the steam.


The gunwale bent without any breakage, and again I used most of my clamps to glue that on to the hull.


For the carlins that support the deck, I was able to use single lengths of sitka spruce left over from my mast stock, so didn't have to worry about joints.  Here the whole length is being steamed.


And here clamped in place.  I clamp in place while it's still in the bag, and can even keep steaming while bending the part into place.


After the wood has cooled down, I unclamp and slip the bag off, then reclamp and allow the wood to dry. The next step for these is to glue them in and plane them to accept the deck. 


Friday, August 1, 2014

Gunwales in progress

Next up to install are the gunwales that stiffen the upper edge of the hull and provide a place to glue the deck to.  I looked around through my lumber stacks and found a couple 10 foot 1 x 8 pine boards that were relatively clear and I started ripping stock for the gunwales.  I had to work around a few knots, so I cut them out and rejoined the pieces with epoxy-glued scarf joints.  I cut them with the bandsaw and then finished them on the disk sander, which gave a nice surface with square faces, and all pieces the same.


I was concerned about the scarf joint's ability to stand up to the heat of steaming.  I read somewhere epoxy is good to about 180 degrees, and of course the steam is about 212 degrees.  I scarfed a test strip and steamed it and was able to bend it to the curve of the hull without failure, so I went ahead with the real stock. Here I'm again using lay-flat plastic tubing as my steam box, which lets me clamp the piece in place while the steam is still flowing.


CRAAACK!  Yep, scarf joint gave way.  <sigh>  The epoxy in the area of the scarf looks kind of grainy or crystalized - must be from the heat.  I broke the joint the rest of the way, and reglued it, then steamed the wood on either side of the joint separately and clamped it in place.  After the wood cooled, I removed the plastic and reclamped the gunwale and left it for a few days while I worked on other things.


Then I removed the gunwale and applied thickened epoxy and clamped it on.  I used a few 23-gauge pins through the gunwale and into the edges of the bulkheads to keep things from sliding around too much while I used most of my clamps to hold in in place.  I didn't need to clamp very hard, but needed a lot of them to pull the hull and the gunwale together all along the length.  I cleaned up the squeeze-out and left it to cure.


After removing the clamps, it looks pretty good.  There's a slight flatness in the area of the scarf joint, but it's not very noticable and I can probably improve on that after the deck is installed and I fair the edge of that.


The gunwale on the other side has two scarf joints, though, so we'll see how that goes.  

After the gunwales, I'll need to cut and install the carlins (which are the same size as the gunwales and run parallel to them about 4 inches inboard, to support the inner edge of the deck). I may rip the stock for the mast/boom/yard from my stock of sitka spruce and see if I have enough of that leftover to use for the carlins. If so, that is long enough to not need any scarf joints. 

Seat edges finished up

After the epoxy cured, I brought the top edges down flush with the seats using a hand plane for the bulk of the work, then finishing up with a hard pad on the random orbit sander, then a soft pad to do the contour.


And finally, I put a fillet of epoxy on the underside to finish this off and close up any small gaps between the edging and the front of the seat.