Showing posts with label seats. Show all posts

Friday, August 1, 2014

Seat edges finished up

After the epoxy cured, I brought the top edges down flush with the seats using a hand plane for the bulk of the work, then finishing up with a hard pad on the random orbit sander, then a soft pad to do the contour.


And finally, I put a fillet of epoxy on the underside to finish this off and close up any small gaps between the edging and the front of the seat.


Tuesday, July 29, 2014

Seat edges constructed and installed

I continued with the seat edge construction by using a router to round over all but the top seat edge. 


I applied several coats of epoxy on the three surfaces that form the seat-board slot, since it's easier to do that before assembly, and after that cured I applied thickened epoxy to the joints and clamped the parts together.


I didn't have any kind of bit to form the large round-over on the front of the seat edges, so I marked out the edges where I wanted to stop the cut.


And used a power plane to remove the bulk of the wood, then finished up with a spokeshave, followed by sanding with the soft pad on my random-orbit sander. 


I fit the back ends to the transom on each side, and then cut them to final length and rounded the forward ends, then coated the remaining untreated areas with epoxy.

On the starboard seat edge I routed a groove for the copper tubing to route the centerboard uphaul line and epoxied that in place.


And after it cured I trimmed off the excess tubing and made sure there were no burrs or sharp edges to wear on the line.


Finally, it was time to epoxy on the port seat edging.  I held this in place with a couple clamps and braces from the other seat front.  Short sticks support the edging at the correct height.  No screws or other fasteners needed.


And the next day glued in the other side.


I left both moldings just proud of the seat tops, so that I can plane/scrape/sand them down to the perfect height.  After painting, the transition should be invisible.  I like the feel of these edges - they are smooth and comfortable.  They add a little weight to the boat, but I think it will be worth it.

Tuesday, July 15, 2014

Seat edge design

I've been thinking about how to finish off the front of the seat edges.  The plans call for a square corner, and then a cleat 3/4" below the edge to provide a ledge for boards spanning the cockpit for a sleeping platform or rowing seat.

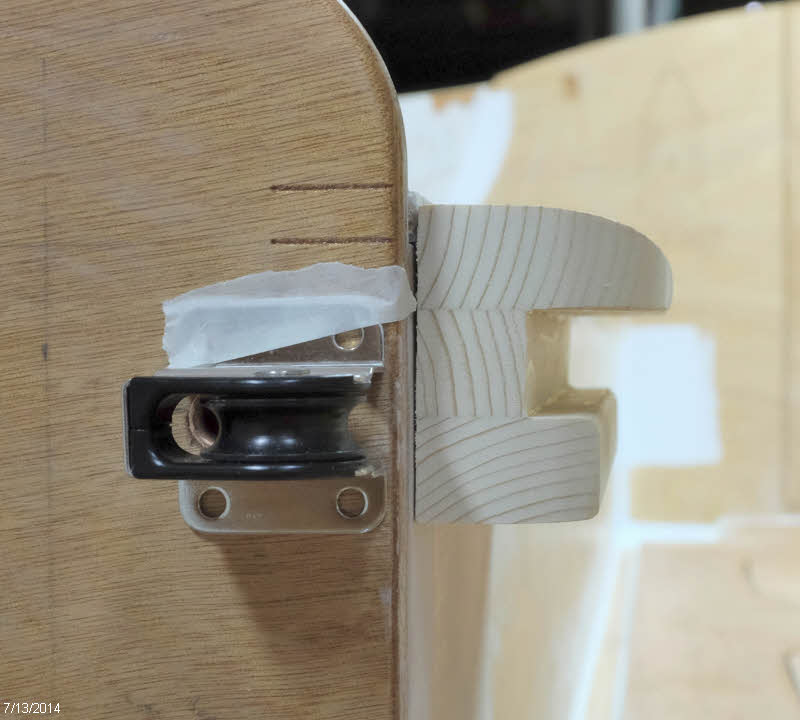
I was interested in easing the edge of the seat and gaining a little additional width.  I prototyped the shape shown in the photo below, which accomplishes that, and also provides a ledge to insert boards across the cockpit.  If I do use boards I expect to make them with a cleat underneath to fit the slot so that the top ends up even with the seat tops.


When I put my edge idea in the boat, though, I could see that I was going to have some interference with the centerboard uphaul line.  I threaded the line through the pulley and taped it down at the angle I expect it to run.


I plan to place a copper pipe in the seat edging to route the line, and I was pleased to see that it would exit the bottom of the edging in a fairly short distance.  The pencil line below shows the expected path of the copper tube.


With the plan in place, I started cutting stock for the two seat edges.  To keep the 6' 9" pieces under control during glue-up I decided to route a tongue and groove arrangement as shown below.  I sized the center piece to have a slot 13/16" high - enough to fit a standard 3/4" board with a little play.


Next I will round the edges and glue things up.


Wednesday, July 9, 2014

Seats installed

Now that the cockpit floor is installed, I next moved on to the seats.  The starboard seat gets a section cut out to provide access to the centerboard from above, which will be handy to have when installing the centerboard.  Since I don't much like square corners, I layed out a curve on the aft end.

I didn't cut this access the full length of the slot, but left it about 8 inches short.  The idea there is to have no seams at the aft end of the trunk.  I have heard that some boats with the cover cut full length could get some water splashing/seeping through the joints, leading to wet clothing, and a recommended solution for that was to have a shorter opening, so I'm trying that.  

For the long straight cut I set up a fence and used the jig saw, after first flattening the set out of the blade with hammer and anvil in order to get a narrower kerf.  


For the corner I used a coping saw, which worked out pretty well.  I should have paid a little more attention to keeping the cut vertical, but it worked out fine.


I rounded over the edges a bit with sandpaper. 


And then put the final coat of epoxy on the underside of the seats and let that cure overnight.


In the morning I spread thickened epoxy on all the cleats and edges of the seat front on set the seats in place. I took care that they fit pretty well, so didn't need any clamps - just a few 23 gauge pins to snug it down and get a little glue squeeze-out. 


I didn't glue the joint between the back of the seats and the hull panels; that joint will be secured when I apply a fillet of epoxy along the joint, which will be the next job.


I'm always glad when the big glue jobs are done!