I've been thinking about how to finish off the front of the seat edges. The plans call for a square corner, and then a cleat 3/4" below the edge to provide a ledge for boards spanning the cockpit for a sleeping platform or rowing seat.
I was interested in easing the edge of the seat and gaining a little additional width. I prototyped the shape shown in the photo below, which accomplishes that, and also provides a ledge to insert boards across the cockpit. If I do use boards I expect to make them with a cleat underneath to fit the slot so that the top ends up even with the seat tops.
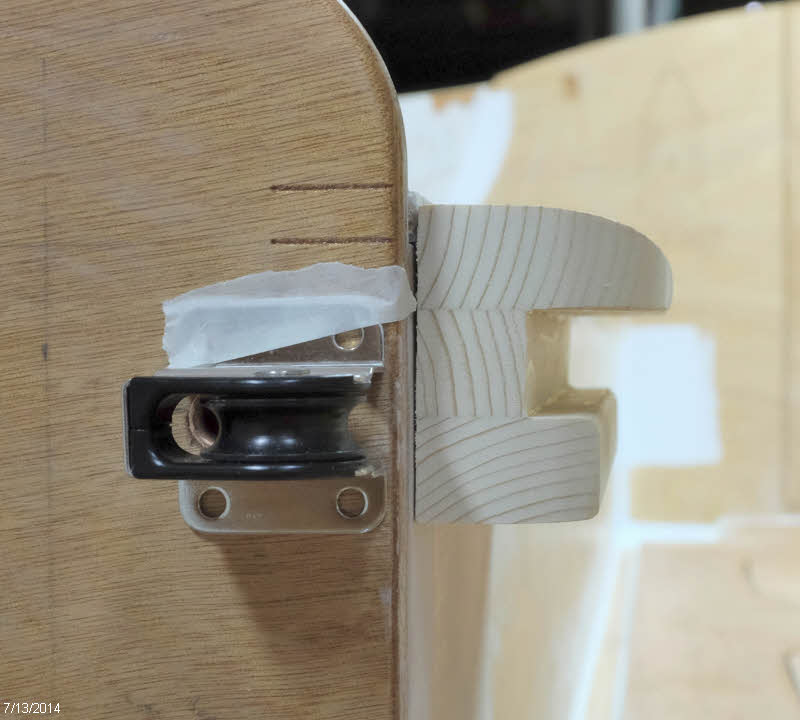
When I put my edge idea in the boat, though, I could see that I was going to have some interference with the centerboard uphaul line. I threaded the line through the pulley and taped it down at the angle I expect it to run.

I plan to place a copper pipe in the seat edging to route the line, and I was pleased to see that it would exit the bottom of the edging in a fairly short distance. The pencil line below shows the expected path of the copper tube.

With the plan in place, I started cutting stock for the two seat edges. To keep the 6' 9" pieces under control during glue-up I decided to route a tongue and groove arrangement as shown below. I sized the center piece to have a slot 13/16" high - enough to fit a standard 3/4" board with a little play.

Next I will round the edges and glue things up.
Dave,
ReplyDeleteLove it, love it, love it! How much width were you able to gain? It appears like around 2", which will make those seats much more comfortable.
Brent
Thanks, Brent. Yes, the width of the top piece is 2", the middle piece is 3/4", and the bottom is 1 3/8". -- Dave
DeleteVery nice solution to both issues.
ReplyDeleteSince you are handy with your tools, think about the cockpit seat-back coaming. I screw/glued a piece of sapele (mahogany type) to the top outboard side as the plans/manual calls for.
Even with a modest round-over on the top edges, it's just too sharp on my upwind forearm while sailing. Not bad on the back, but then I'm always cushioned by my PFD.
In retrospect and not under the time pressure to finish my build, I would have fashioned a hardwood cap that sat above the coaming edge, protecting the end grain of the coaming plywood, and overhanging down the outboard side of the coaming.
This would also allow a very generous round-over on both inboard and outboard edges and a much easier surface for the final paint to adhere to. My paint does tend to wear there and chip off in areas
Another nice touch is what Dale Simonson did with his Luna (#162) with a butt-perch seat at the aft end of the coaming, for a bit of semi-hiking cushion. Here's a photo link to his build photostream during painting stage https://www.flickr.com/photos/dale_simonson/13984427403/in/set-72157631600282803
You are doing great work!
Simeon
Thanks for the good idea for the seat back edge, Simeon. I definitely want to do something like that, but haven't thought about the details yet. I hadn't thought about needing a gentle edge for upwind arm comfort - thanks for the real-life sailing viewpoint.
DeleteI did see the photo of Dale's butt-perch previously, and want to incorporate something like that. I think it's good to have a couple different comfortable positions to assume while out on a sail.
-- Dave
Dave, with regard to my build, wouldn't it be easier to screw the 2" seat extension to the seat longitude piece prior to assembling the CB case (so I still have access from inside the case to screw through the case into the seat extension)? Any reason this wouldn't work from your perspective? Brent
ReplyDeleteHi, Brent - I like the way you are thinking ahead! I prefer to work on the bench vs. in the boat, too.
DeleteIf you were to do that, since the seat tops sit on top of the longitudinals, you'd need to be careful that the new seat extension is offset upward the thickness of the seat ply to account for that.
But I'm concerned that the seat extension will be too much in the way when you install the cockpit sole. Because of that I think I would probably choose to wait until after the sole is in. You could then put the seat extensions on before gluing down the seat tops, as you'd have access to the back side of the longitudinals at that point. But you wouldn't be working on the bench, of course.
-- Dave
Dave, Thanks for the advise. I never thought about the cockpit sole issue. Yes, I would have access to the seat longitudinals, but would loose access where the CB case goes. I want to screw the seat extension through the inside CB case side…make sense? In the end, I bet you are right that the cockpit sole won't fit if I install the seat extensions now. Thanks for reminding me of this issue. Brent
ReplyDelete